Our White label options are included with 10+ dashboards plans.
With those options, you get four things:
- Your custom domain is displayed in the URL of the dashboards you are sharing. When opened in View Mode, your clients will see your custom domain instead of DashThis domain. (e.g., from reports.dashthis.com to reports.yourcompany.com!)
Only one custom domain can be set up in your account. If you want different custom domains for each of your dashboards, this can only be available if you create multiple DashThis accounts.
- You can choose the email address you want to send your dashboards from when sharing them.
- The "Powered by DashThis" logo displayed at the bottom of your dashboards is removed.
To remove the Powered by DashThis logo at the bottom of your dashboards, the CNAME must be activated in your account. Without the CNAME, the logo will always stay visible. Once your custom domain is fully set up and validated in the White Label Options section, the logo disappears automatically.
- Unlock our custom colour theme feature. Learn more
Here is an important clarification. To remove the Powered by DashThis logo at the bottom of your dashboards, the CNAME must be activated in your account. Without the CNAME, the logo will always stay visible. You will be able to remove the logo only after the custom domain is fully set up and validated in the White Label Options section.
2- Add your custom domain in DashThis
1- Create your CNAME record
What's a CNAME record?
A CNAME record is an alias allowing you to map your custom domain to the DashThis domain. This CNAME record could be anything you want. They usually look like ''report.yourdomain.com'' or ''dashboard.yourdomain.com'', but feel free to choose whatever is best suited for you. Keep in mind that this CNAME will be used in the URL of all your DashThis reports.
How to set up your CNAME?
For this part, you need to fly on your own and set it up yourself on your domain provider account!
The process can be a bit different from one provider to another, but usually, it comes down to those steps:
- Sign in to your domain provider.
- Go to your DNS records and select the option to add a new record.
- Choose the type "CNAME".
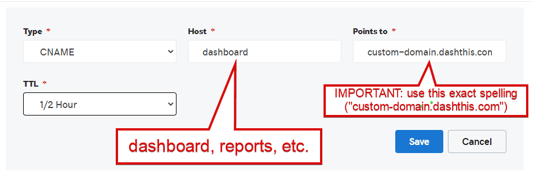
- Enter the subdomain you've chosen for your CNAME record.
i.e. if your chosen custom domain is "dashboard.yourdomain.com", the subdomain or host would be "dashboard". - Enter "custom-domain.dashthis.com" as the domain it will point to.
- Save your changes.
Here are support articles from the most popular domain providers:
- GoDaddy
- Amazon
- Cloudflare. In this case, make sure that the proxy status is set to DNS only (not proxied).

2- Add your custom domain in DashThis
- Back in DashThis, go to the White Label Options section.

- Enter the full custom domain you've chosen, for example, "dashboard.yourdomain.com".
- Once done, you must test the validity of your custom domain and make sure your CNAME record is well installed in your domain provider.

- You can also enter the email address you would like to use to send your dashboards via email. We recommend you use an email address similar to your custom domain.

- Finally, you can click on "Apply" to activate your custom domain right away in your dashboards' URLs. Only the SSL certificate (HTTPS) may take up to 15 minutes to be applied.
At any time, you can remove your custom domain from your dashboards' URLs.
You can also change it to a new custom domain. Simply get through the same process again, and make sure you registered the new CNAME record in your domain provider.
If you're wondering what your custom domain will look like once someone else opens your dashboard you can see this in three easy steps:
First: copy the dashboard URL link 
Second: Log out of DashThis
Third: Paste the URL into your browser and voilà!
3- Notes
- If additional security parameters are applied to your domain (i.e. DKIM authentication and SPF verification), and you're using the "Share via email" function for your dashboards, it is possible that your clients won't receive those emails unless you take these additional steps.
- A new record needs to be created in your domain provider settings in order to authenticate DashThis email servers and make sure your dashboards will be sent properly.
- To do so, please get in touch with us to get the whole procedure.
- Want to see what your custom domain looks like? Copy one of your dashboard URL > sign out of DashThis and paste the URL into your browser.
- Already have a custom domain name set up but your client is getting a 404 page? Verify your security settings and make sure that ''manage IP access'' is unchecked.
